


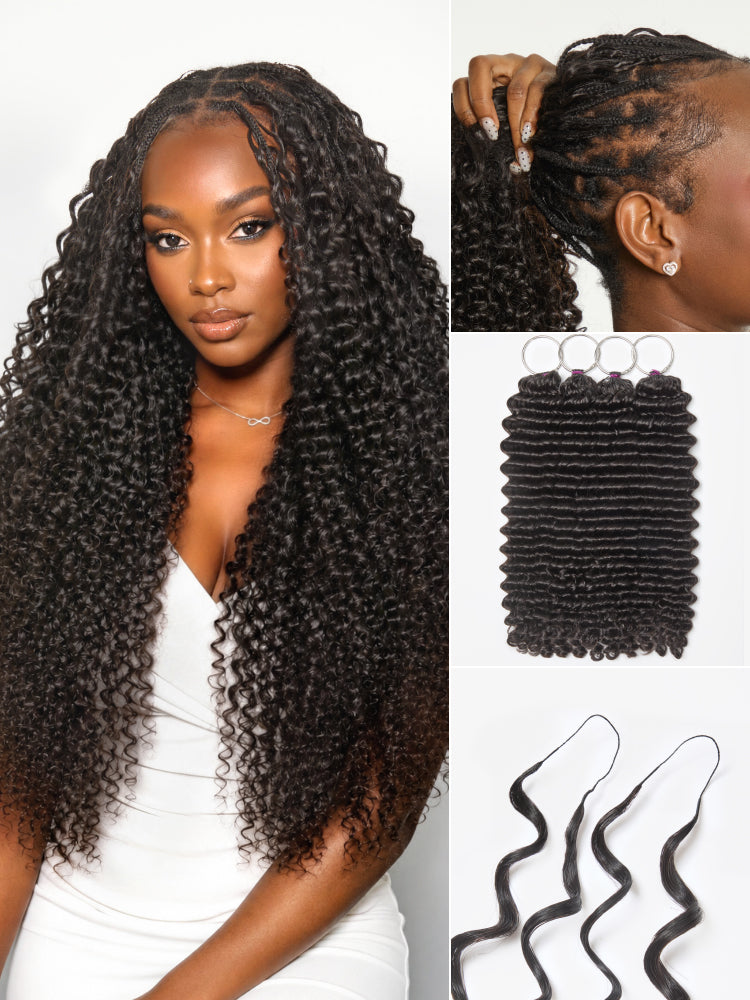
Crochet hair is one of the most practical protective styling methods because it gives you volume, texture, and a natural-looking finish without installing every strand one by one. With a flat cornrow base, the right crochet hair extensions, and a latch hook, you can create curls, waves, boho braid pieces, or fuller textured styles at home.
To install crochet hair, create a flat cornrow base first, then use a latch hook to pull pre-looped crochet hair through each braid. Work from the nape upward, space the pieces evenly, keep the hairline lighter, and finish with trimming, mousse, and a satin scarf for a natural shape.
Table of Contents
- Video Tutorial: Easy Crochet Hair Install
- What You Need to Install Crochet Hair
- How to Choose the Right Crochet Hair Before Installing
- How to Prepare Your Hair Before Installing Crochet Hair
- How to Install Crochet Hair Step by Step
- Common Crochet Hair Installation Mistakes to Avoid
- How to Maintain Crochet Hair After Installation
- Best Luvme Crochet Hair Extensions for Beginners
- FAQ About Installing Crochet Hair
Video Tutorial: Easy Crochet Hair Install
Watch this quick crochet hair install tutorial before starting the step-by-step guide. The video shows how crochet hair is placed and secured so beginners can better understand the latch hook method.
Easy Crochet Hair Install TutorialWhat You Need to Install Crochet Hair
A clean crochet install starts with simple tools and good preparation. Beginners often find pre-looped or pre-separated crochet hair easier because the pieces are already organized for faster placement.
| Item | Purpose |
|---|---|
| Crochet hook or latch hook | Pulls the crochet hair through each cornrow and helps secure the loop. |
| Rat-tail comb | Creates clean parts before braiding your base. |
| Sectioning clips | Keeps hair organized while you braid and install. |
| Scissors | Trims uneven ends and shapes the finished style. |
| Mousse or styling foam | Reduces frizz and helps set the top and hairline. |
| Satin scarf or bonnet | Protects the style at night and helps the hairline lay flat. |
| Crochet hair extensions | Use 3–4 packs for a light or short look, 4–6 packs for medium fullness, and 6–8 packs for a fuller or longer install. |
How to Choose the Right Crochet Hair Before Installing
The best crochet hair depends on the final style you want. Curly crochet hair creates soft volume and covers the cornrow base easily. Deep wave crochet hair gives more defined movement. Wet and wavy pieces work well for boho braid styles, while kinky straight crochet hair gives a natural blowout-inspired finish.
For beginners, choose hair that is easy to separate, lightweight, and not too bulky at the root. Larger curls usually need more spacing between pieces, while straighter textures may need slightly closer placement for full coverage. For a fuller texture-focused look, explore more curly crochet hair options.
How to Prepare Your Hair Before Installing Crochet Hair
Before installing crochet hair, wash and dry your natural hair completely. Detangle carefully so your cornrows can sit flat against the scalp. A smooth braid base matters because bumps underneath can make the finished style look bulky, especially with curly or deep wave crochet textures.
Avoid braiding too tightly. Crochet hair is a protective style only when the foundation is comfortable and low tension. If your scalp feels painful before adding the extensions, the style will likely feel worse after installation.
How to Install Crochet Hair Step by Step
-
Step 1: Create a Flat Cornrow Base
Start with neat cornrows that are secure but not tight. Straight-back rows work well for most crochet hair styles. Keep the braids low-profile so the crochet pieces can sit naturally and avoid a lumpy finish.
 A flat cornrow base helps the crochet hair sit naturally.
-
Step 2: Map Your Crochet Hair Placement
Before using the hook, decide where you want the most volume. Keep the hairline and part area lighter, then build more density through the crown and back. For larger curls, leave more space between pieces so the final look does not become too heavy.
-
Step 3: Use the Latch Hook Crochet Method
Slide the latch hook under a cornrow, place the crochet hair loop onto the hook, close the latch, and pull the loop back under the braid. Pull the hair ends through the loop and tighten until secure. The knot should feel snug, not painful.
 Use the latch hook to pull the crochet loop under the cornrow.
-
Step 4: Install Row by Row
Start at the nape and work upward. Use similar-sized pieces for a balanced finish and check both sides every few rows. This keeps the fullness even and helps prevent one side from looking heavier than the other.
-
Step 5: Keep the Hairline and Part Natural
Around the hairline, use smaller pieces and wider spacing. Crowding the edges can make knots look bulky. If you want a visible part, avoid placing too many pieces directly on the part line; add fullness behind it instead.
-
Step 6: Blend, Shape, and Finish the Style
Once the install is complete, separate curls with your fingers, trim lightly for shape, and apply mousse or foam to reduce flyaways. Tie the hair down with a satin scarf for 10–15 minutes to help the top and hairline lay smoothly.
Common Crochet Hair Installation Mistakes to Avoid
Small installation choices can make a big difference in how natural and comfortable crochet hair feels. Avoid these beginner mistakes before they affect the final look.
| Mistake | Why It Matters | Better Fix |
|---|---|---|
| Braiding the base too tight | Can cause scalp tension and discomfort. | Keep cornrows secure but comfortable. |
| Adding too much hair at the hairline | Makes knots look bulky and less realistic. | Use smaller pieces and lighter spacing around edges. |
| Placing curls too close together | Creates a heavy or overly dense finish. | Leave more space for large curls and fuller textures. |
| Pulling knots too tight | Can make the style uncomfortable. | Tighten until secure, not painful. |
| Brushing curly crochet hair | May cause frizz and disturb curl definition. | Finger-separate curls and trim slowly for shape. |
How to Maintain Crochet Hair After Installation
Crochet hair lasts longer when you protect the curls and keep your scalp clean. At night, wear a satin bonnet or scarf to reduce friction. In the morning, refresh the style with a light mist or mousse instead of heavy gels or sticky products.
Use fingers to separate curls and avoid rough brushing.
Apply a small amount of mousse to smooth flyaways.
Use light scalp care between cornrows without soaking the style.
Cut only extension hair near the knot, then slide the knots off gently.
Most crochet installs can last several weeks depending on your braid base, texture, and maintenance routine. For buying quantity, review this guide on how many packs of crochet hair you need.
Best Luvme Crochet Hair Extensions for Beginners
These Luvme crochet hair extension picks are helpful for different beginner-friendly install goals, from soft boho braid pieces to deeper waves and natural kinky straight texture.
A versatile option for shoppers who want to test different crochet textures.
Shop Now
Defined movement for fuller wave looks and protective styling.
Shop Now
A warm ombre option for dimensional boho braid and crochet styles.
Shop Now
A natural blowout-inspired texture for fuller protective styles.
Shop NowFAQ About Installing Crochet Hair
Can beginners install crochet hair at home?
Yes. Beginners can install crochet hair at home if they start with a flat cornrow base, use a latch hook carefully, and choose pre-looped or pre-separated crochet hair for easier placement.
How long does it take to install crochet hair?
Most crochet hair installs take about 1.5 to 3 hours, depending on the cornrow pattern, hair texture, fullness, and your installation experience.
How many packs of crochet hair do I need for a full head?
A natural look usually needs 3–5 packs, while a fuller or longer style may need 5–8 packs. Large curls often need fewer pieces because they create more volume.
How do I keep crochet hair from looking bulky?
Keep the cornrow base flat, use smaller pieces at the hairline, avoid crowding the part area, and leave more space between larger curls.
Conclusion
Installing crochet hair is easier when you work with a clear plan: prepare your natural hair, create a flat cornrow base, map your placement, use the latch hook method, and finish with shaping and mousse. Keep the hairline light, avoid tight knots, and protect the style at night to make your crochet hair look natural and last longer.


